Showing posts with label OCI. Show all posts

Thursday, March 6, 2025

Integrate Oracle APEX with OCI Identity and Access Management

Integrate Oracle APEX with OCI Identity and Access Management

Configure APEX with OCI Identity and Access Management. Here are simple steps.
First I will create a demo application i.e. Sales App in APEX and then will configure the IAM to integrated with APEX.

I am dividing this in two parts.
Part 1: Create application in APEX
Part 2: Integrate Oracle APEX with OCI IAM.

Part 1: Create application in APEX

1) Login to your APEX Application
2) Click on App Builder -> Click on create button.


3) Select option "Create App From a File".

4) Click on "Copy and Paste" tab. Then click on drop down button and select "Sales" application

5) Provide appropriate table name. I have given "SALESTB" in my example. And click on "Load Data" button below the screen.

6) It will load data. Once data loading completed click on "Create Application" button given below the screen.

7) Provide name of you application i.e. "SalesApp". Select Apperance style.

8) Select all the features of the application and click "Create Application" button.


Application creation will be done in 1-2 miniutes.

Once it is completed, you will see the screen as below.


Part 2: Integrate Oracle APEX with OCI IAM.

Once you install/create application in APEX. Now it's time to configure OCI IAM.

1) Navigate to "Identity & Security" -> Under Identity click on "Domains"


2) Here you will see the default domain created for you while you had provisioned the OCI Tenancy.
Click on "Default" domain.


3) Click on "Integrated Applications" and then -> "Add Application" button.


4) Select "Confidential Application" and click "Launch workflow" button. 

5) Provide appropriate application name. Here in my example it is "ApexSalesApp". 
Do not modify any other values and click "Next"


6) Skip the server configuration. For Client configuration click on "Configure this application as a client now" radio button.
Select the "Authorization code" check box and click "Next".


7) Provide Redirect URL and Post-logout redirect URL.

    Here is the syntax of the URLs.
    Redirect URL: https://<myadb>.eu-frankfurt-1.oraclecloudapps.com/ords/apex_authentication.callback
Post-logout redirect URL (optional): https://<myadb>.adb.eu-frankfurt-1.oraclecloudapps.com/ords/home

    In my case Redirect URL is
    https://geb397a43cf343c-cbtapexprod.adb.ap-mumbai-        1.oraclecloudapps.com/ords/apex_authentication.callback

    Post-logout redirect URL is https://geb397a43cf343c-cbtapexprod.adb.ap-mumbai-    1.oraclecloudapps.com/ords/r/cbtapex/salesapp/home


8) We will not configure web tier policy so select "Skip and do later".
    Click on "Finish" button below the screen.


9) After finishing this, you will see the "ApexSalesApp" detail page as below. Application is in INACTIVE state.


10) Click on "Edit application" button.

    Below the edit page, under "Authentication and authorization" click check box of "Enforce Grants as     Authorization" and then Save Changes button.


11) Now click on the "Activate" button 

    Click on Activate application button on confirmation screen

    In no time the application will be activated.

12) Please do note down the Client ID and Secrete code somewhere in your notepad or copy directly from this screen. This will be used to configure the credentials in APEX.


13) Now, come back to the APEX application i.e. "SalesApp", Navigate to "Shared Components"

14) Right hand side below, you will see the "Credential" link, click on that link.


15) Click on "Create" button


16) Now Provide below infomation,
    Name - OCI IAM Sales App Credentials
    Static ID - OCI_IAM_Sales_App_Credentials
    Authentication Type - Basic Authentication
    Client ID or Username- This is the same we collected in previous step of OCI IAM of Client ID.
    Client Secret or Password - This is the same we collected in previous step of OCI IAM of Client Secret.
    Verify Client Secret or Password - This is the same we collected in previous step of OCI IAM of     Client Secret.

    Click Create button to create the credentials.

    You can see the credentials are created.

17) Now go back to the OCI IAM - > ApexSalesApp details page.
      Click on the Users -> Add Users -> select the available Users from the list to whom you want to               grant access to the APEX application. Clicl Assign button.


    In my example I have given access to one user only.


18) Now, Go back to your APEX application -> Shared Components -> Under Security click on "Authentication Schemes"


19) Click on "Create" button to create new schemes.

20) Keep the default option (Based on a pre-configured scheme for the gallery) and click Next

21) Provide below parameter as shown in screenshot.

    Name - OCI IAM SalesApp Auth Scheme
    Scheme Type - Social Sign-In
    Credential Store - OCI IAM Sales App Credentials  -> This we created previously in create cedential     steps. Choose it from the drop down menu.
    Authentication Provider - OpenID Connect Provider
    Discovery URL - https://idcs-a947aa0b126a47fd84b34cc647be6e03.identity.oraclecloud.com:443/.well-known/openid-configuration/
    Scope - profile,email,groups
    Username - #sub# 
    Additional User Attributes - groups

    Click on "Create Authentication Scheme" button.


    Here discovery URL is nothing but your domain URL just append /.well-known/openid-configuration/     at the end of your domain URL.

    Where do you find the domain URL? 
    Go to the Domain - Overview section and you will find the domain URL as shown in below             screenshot.


22) Now "OCI IAM SalesApp Auth Scheme" is created. Click on the "OCI IAM SalesApp Auth Scheme" link to edit it.

    Click on "Post-Logout URL" and provide the Logout URL 
    The Post-Logout URL is in the form             https://<host_name>/ords/r/<alias_schema_name>/<app_name>/home and it is the IDCS (now IAM)         URL redirect after logging out (it is optional, however recommended).

    In my case https://geb397a43cf343c-cbtapexprod.adb.ap-mumbai-            1.oraclecloudapps.com/ords/r/cbtapex/salesapp/home is my logout URL which redirect to home page of     my application.

    Click on "Apply Changes" button.


23) Now Click again on the "OCI IAM SalesApp Auth Scheme" link to edit it.
      Make this Scheme as current scheme by clicking "Make Current Scheme" button.

    Click OK.

    Now you can see, "OCI IAM SalesApp Auth Scheme" is the current scheme for this application.

24) Now, go back to the Shared Component -> Under Security -> Click on "Security Attributes"


25) Provide input as follow,
    Under Authentication, 
        Authentication Scheme - OCI IAM SalesApp Auth Scheme

    Under Authorization
        Authorization Scheme - No application authorization required -
        Source for Role or Group Schemes - Custom Code

    Click "Apply Changes" button

    Now Final steps to Run the application and Test if it is working or not.
    Click Run Application button.

You will redirect to OCI Cloud Account form: insert your username and password (in my case is Oracle SSO):

    
    The Integrated Application access page shows up: on this page click Allow


    And you are Logged-In...


Thanks & Regards,
Chandan Tanwani


Friday, March 22, 2024

Connect ATP Private EndPoint Database via Public Load Balancer using SQL Developer

Connect ATP Private EndPoint Database via Public Load Balancer 

In my previous post, we have seen How to create ATP Database with Private Endpoint aka with private dedicated IP of ATP database. Click here to refer previous post.

Now, in this post we will see how we can connect an ATP database (created with a private endpoint) via public load balancer.

Click on Networking -> Load balancer -> load balancer
Click on "Create load balancer" button

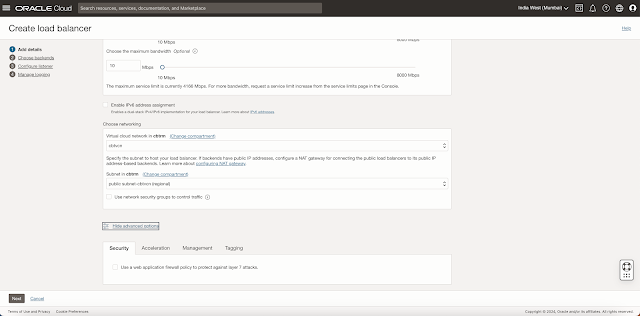
  • Provide Load balancer name = CBTPubLB
  • Choose visibility type = Public
  • Assign a public IP address = Ephemeral IP Address (This will automatically assign a public IP address from the available IP address from the pool.)


  • Choose VCN = cbtvcn (Your VCN)
  • Choose subnet = public subnet-cbtvcn (Your public subnet)
Now Click Next.


Note that in my case I will add backends after creating the Load balancer. If you want to add a backend now, you can.

Now, specify the health check policy
  • Choose Protocol as TCP from the dropdown menu.
  • Choose Port = 1522
Leave other fields as default

In advance tab. I am not changing anything. Keeping all the fields as default values.

below screenshots are just for your references purpose.


Click Next to configure Listener
  • Provide proper Listener name, In my case, it is "DB_LSNR"
  • Specify the type of traffic as TCP
  • Specify the port as 1522
I am not providing any SSL certificate here.


Click Next 

Now, You can enable the Error log and access log,
Here in my case I have enabled only Error log, please refer below screenshot


Click on Submit button to create load balancer

It will take a couple of minutes to create a load balancer.


Now you can see the load balancer is created but the health is Critical. This is due to backendset. Yet we have not configured the backend set.

Now Click on the Backend sets -> Backends -> Add backends

Provide the IP address of your ATP database which is shown under the Network section of your ATP detail page. Please refer to the screenshot below for your reference.


Now Click on CBT_BS bankend set. 
Here you can see number of backends are zeero.


Click on Add backends button

Provide IP address and port number.

Click Add button


Click on close button to close the window.


Once added, health will be in critical state, It will take a couple of minutes to change the health status.


You can see backend is added but health is in Critical state.

You can see more details by moving your mouse pointer on Critical text.

Must remember that, you need to configure VCN ingress rule for your private and public subnet.

In my example, refer below screenshot of default security list - public subnet and Private security list for private subnet.


Once done, check the status of your public load balancer. 
Backend health must be OK. This means that the Load balancer is able to ping the ATP database.

Now you can see the backend health in Green Icon as OK.

After adding ingress rule it will take 1-2 minutes to reflect in load balancer to make the health OK. 


You can see the overall load balancer health is now also in Green- OK


Now, Click on the Autonomous database CBTATP1 -> click on the "Database connection" button.

Click on Download wallet button -> provide the wallet password.


It will download the zip file. Unzip the wallet.zip file.
Open the tnsnames.ora file
Replace your ATP host name with the Public Load Balancer IP.

refer below screenshot for your reference.

Save tnsnames.ora file


Zip all the files again and give another name of zip file. Here in my case it is CBTATP_LB_IP.zip.

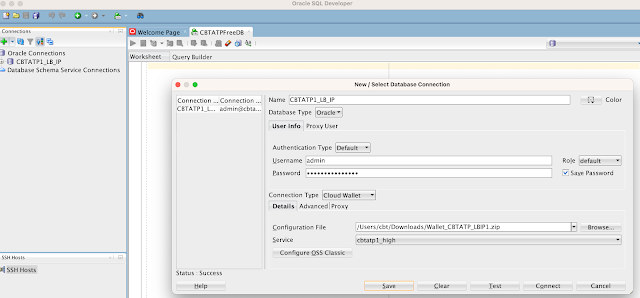
Open the SQL developer -> click on new connection
  • Provide connection name - CBTATP1DB
  • username = admin
  • password = <admin password> (This is the same password which you given during creation of your ATP database)
  • choose connection Type= Cloud Wallet
Browse and select the .zip file which you created just now.

click on the test button to test.


This is it.


Hope this article will help you.
Thanks for reading.


Thanks & Regards,
Chandan Tanwani